Categories
Photography Photoshop Photoshop CC

Creative Blending in Photoshop

One of my favorite photographers/artists is Pep Ventosa. He’s known for some very creative Photoshop techniques that blend images in unique and unusual ways. I fell in love with a couple of his styles when I discovered him years ago – and later met him at an Open Studios event he held in San Francisco. We now own several of his prints and have given a couple away as gifts.

Another great photographer who utilizes some very creative techniques for her images is Roxanne Overton – here’s her Instagram feed – she provides me with regular creative inspiration! From time to time she uses techniques similar to what I’m describing here.

Earlier this week, I took an online seminar from Santa Fe Workshops taught by Julieanne Kost, the long-time evangelist for Adobe. Titled “Beyond the Single Image” this workshop focused on Julieanne’s creative process – primarily her approach to compositing multiple images together in Photoshop. She showed a number of techniques – it was a great learning experience. She has an excellent blog where she frequently covers her techniques as well as having been featured in several YouTube videos that cover many of them as well. In addition, she’s an excellent teacher and has several online courses available on LinkedIn Learning/Lynda.com.

One of the most interesting to me was a technique to blend multiple images together in a unique way that, as it turns out, results in an image with some of the same look as one of Pep Ventosa’s styles. When she showed the technique, she used it initially with video – using Photoshop’s video editing capabilities to blend together multiple images from a video to simulate a long exposure image with smooth water. This technique opened my eyes to how Photoshop could be used to perform frame captures from a video file and how she used a technique to blend them together.

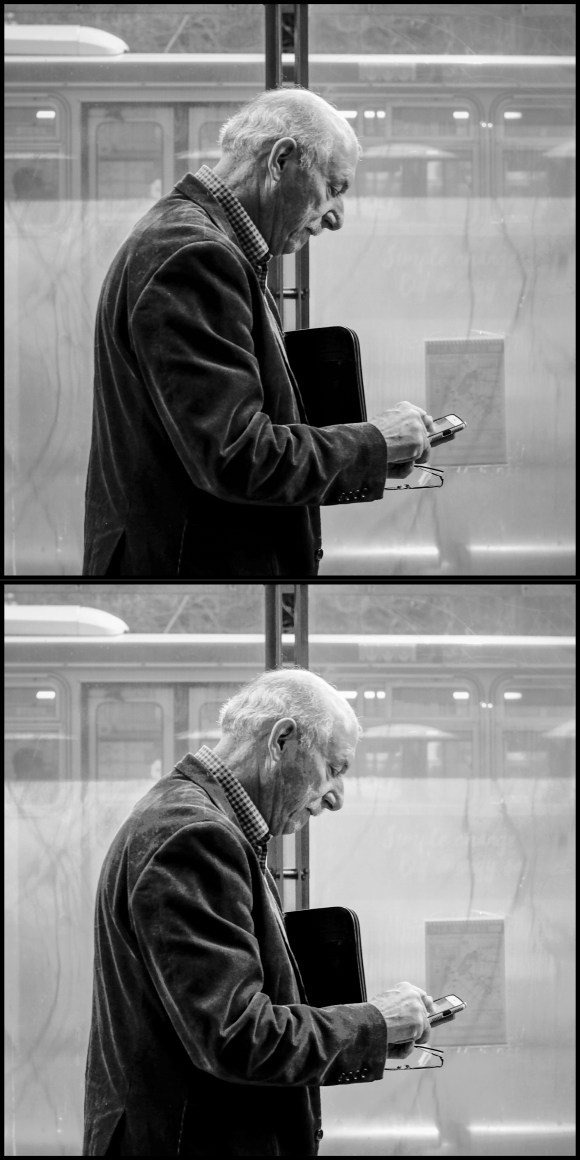
The technique can also be used with still images – instead of a video file – to create a blended image that is somewhat analogous to one of Pep Ventosa’s styles. Here’s a step-by-step walkthrough of this technique that I used to create the blend above that I made from four photos taken during a recent visit to Hong Kong. All of my originals are kept in Lightroom Classic – so the process starts there.

  1. Select 3+ (your choice how many) images in grid view in Lightroom Classic. With the images selected, right-click and choose Open as Layers in Photoshop.
  2. In Photoshop, after the layers are all open (may take a minute), select all the layers. Then choose Layer/Smart Objects/Convert to Smart Object.
  3. After the layers have been converted to a Smart Object, choose Layer/Smart Objects/Stack Mode/Mean. This will create a blend of all of the images with a look similar to one of Pep Ventosa’s styles.
  4. Now, you’ll typically want to feature just one element in one of the images – in other words, you will want to bring out some specific details from the blend. To do that, you’ll want to select the appropriate layer with the details that you want to use and then paste it as a new layer on top of the Mean version and begin to do some blending. To do that, double click on the smart object icon in the layers panel. This will open a new Photoshop document with all of the layers shown individually. Select the specific layer that you want and do copy all. Then switch back to the Mean version image and paste – this will create a new layer on top with your selected image. After that you can add a layer mask and you can begin blending as you normally would. Typically I start with a black layer mask and use a brush with white and reduced flow to paint in where I want the details to show.
  5. Once you’re done with blending, flatten the layers and save the image – which will bring the final version back into Lightroom. Or, if you think you may want to re-edit again, you could just save without flattening which will bring it back into LR – but it will be a very large file with all of the layers embedded, etc.

That’s it. It’s a fun technique to experiment with. I’m sure there’s some skill involved in selected the right few images to blend with this technique. You will need to play a bit to learn what strikes your fancy in applying this technique.

Thanks very much to Julieanne for sharing her techniques and helping me learn! Below are some other images I’ve created using this technique. Enjoy!

Reader – Rome
Pals – Rome
Mirage – Hong Kong
Categories
iPhone Xs Max Lightroom Lightroom CC Photography Photography - Black & White Photoshop Photoshop CC San Francisco/California Topaz

Curvy

Last Friday my friends Doug Kaye, Steve Disenhof and I spent some time at the recently re-opened Salesforce Park in San Francisco. This park is above the Transit Center on the roof – elevators at either end bring you up to this roof top level.

One of the fun things to see at the park is a fountain (you can just see the holes for the nozzles in the white ring above) that’s triggered when a bus comes through the Transit Center below. There’s a glass wall behind the fountain that makes for some fun reflections. That’s a reflection of Steve walking in the upper right corner (with the hat!).

With this image, I tweaked it a bit in Lightroom, Photoshop and Topaz Simplify to give it a more painterly effect in black and white. The original image – shot with my iPhone Xs Max – is below:

Categories
Black and White Lightroom Monochrome Photography Nik Software Photography Photography - Black & White Photography - Sony RX100M6 Photoshop Photoshop CC San Francisco/California

The San Francisco-Oakland Bay Bridge

Otherwise known as the Willie L. Brown, Jr. Bridge!

Image made with my Sony RX100 Mark VI handheld at 24 mm, f/6.3. Edited in Lightroom, Photoshop, and Nik’s Silver Efex Pro 2.

Categories
Black and White Monochrome Photography Photography Photography - Black & White Photoshop Photoshop CC San Francisco/California Street Photography

Adding Presence to Black and White Photos

Three years ago I was in Havana participating in a person-to-person cultural exchange organized by the Santa Fe Photographic Workshops. One of the photography group leaders at that session was George DeWolfe. While I wasn’t in his group, we did share breakfast a couple of days and I really enjoyed getting to know him a bit more.

After that meeting, I’ve followed George from a distance – and I particularly enjoy the work he’s been doing for years around the notion of adding “presence” to black and white images. I haven’t been using his techniques, however – but a blog post that I read this morning by Julia Anna Gospodarou brought me back to George and re-learning one of his simple techniques for adding presence to an image in Photoshop.

Last night I processed the top image below taken on a photo walk with Doug Kaye in San Francisco last Thursday. We often find the Muni bus stops along San Francisco’s Market Street to be good “stages” – and we await for interesting actors to appear. I was pretty happy with the image last night but when I looked at it again this morning I found it a bit “flat”.

Reading Julia Anna’s interview with George got me motivated to try a quick version of one of his techniques for adding presence – using the Color Range tool in Photoshop to separately adjust the brightness and contract of the highlight, mid-tone, and shadow areas of the image. This is a super easy technique – using the Color Range tool to create a selection of, for example, the highlights in the image – then use a Brightness/Contrast adjustment layer to tweak the brightness and contrast of just the highlights. Do the same thing for the mid-tones and then for the shadows. Takes about 2 minutes to adjust the image this way – and it does help reduce the flatness and spread out the tonality of the image to make it more appealing. The second image below shows the result of my quick adjustments this morning.

There are other ways to accomplish this – with much finer grain control, for example, you can use Tony Kuyper’s Luminosity Mask technique to also do this. But the quickness of using Color Range with a few Brightness/Contrast adjustment layers makes for a very speedy workflow. Thanks to George DeWolfe for sharing this technique – which he first wrote about back in 2007, almost ten years ago.

Categories
Black and White Photography Photography - Black & White Photoshop Photoshop CC

Moments at Drakes Beach – Experimenting in Black and White

Moment - Drakes Beach - 2013

I been doing a bit of experimenting over the last few days with black and white conversion techniques. I particularly find the work of Joel Tjintjelaar of interest – see his Joel Tjintjelaar Flickr Stream and his BWvision web site.

Joel’s latest work is based on a combination of masking techniques – traditional “hard selections” combined with luminosity masking techniques pioneered by Tony Kuyper. I’m intrigued with the notion of applying these techniques to street photography and will be experimenting more to see if we can create even more vibrant black and white street photographs using modifications of Joel’s and Tony’s techniques applied to street photography.

Here are a couple of additional examples from my experiments over the last few days:

Luke - Drakes Beach - 2013

David W. Packard Electrical Engineering Building - Stanford - 2011

Categories
Photography Photoshop Photoshop CC

Just Back from Dan Margulis’ Applied Color Theory Workshop

Double Vision - San Diego - 2013

I’m just back from four intensive days with Dan Margulis and four other students (including my friend Doug Kaye) attending his four-day Applied Color Theory in Photoshop workshop. Over the last twenty years, Dan has developed and refined his techniques for color correction and image enhancement of images using Photoshop.

Dan’s written three major books on the subject of Photoshop – which I have and have tried to read and apply – but there’s nothing that can replace the opportunity to actually “do it” in a classroom. For me, this workshop might best be described as a Photoshop “retreat” – spending four long days with a true master of his craft and trying to learn and apply his teachings. The experience was very rewarding – providing me with new insights into what’s possible with images.

The image up top is one example of me attempting to apply some of these techniques. The evening before the workshop, Doug and I headed to Old Town – San Diego with our rangefinder cameras in hand (my Fujifilm X100S and his – a Sony RX1R from Borrowlenses.com that he’s reviewing). The original of this image has a yellow cast – and the first step in Dan’s workflow is to try to correct for color cast before doing anything else. The color cast in this image included a lot of yellow from the wall paint and a lot of blue from the outside light flooding into the room through a doorway. This final result is reasonably balanced and captures the lively colors in the scene. The left facing surfaces still include a blue cast – but the humans look reasonably normal! Not perfect, but better than the original – thanks to new learnings from Dan’s teachings!

This image also uses a technique that Lee Varis taught me – about how to desaturate the color in the shadow areas to provide a greater sense of depth to the image.

Categories
Black and White Monochrome Photography Photography Photography - Black & White Photography - Canon 5D Mark II Photoshop Yosemite

Back to Yosemite’s Three Brothers

Three Brothers - Yosemite - 2010

Earlier today, I was looking the Ansel Adams Gallery’s special sale of platinum-palladium prints by Kerik Kouklis – which got me exploring some new techniques using a Curves adjustment layer for toning in Photoshop.

I decided to try the technique on an image shot in October 2010 along the Merced River in Yosemite. My son David and I were doing a private workshop that day with Michael Frye – and this location was one of the special spots Michael shared with us. A color HDR version of some other photos of Three Brothers is one of my favorites from that day.

This image is a single shot RAW image taken on a tripod with my Canon 5D Mark II using the Canon 24-105mm f/4 L lens. I processed it in Photoshop CC using a few of Tony Kuyper’s basic luminosity masking techniques, converted it to black and white using a gradient map, sharpened it using the Sharpen 2013 action of Don Margulis’ Picture Postcard Workflow – and then toned it using a curves adjustment layer using a curve from Paul Butzi.

Categories
Photography Photography - Nikon D600 Photoshop

Using Photoshop’s Motion Blur in a Landscape Image

Up Ahead - Fitzgerald Marine Reserve - 2013

Last Sunday, on a very foggy overcast morning, I headed to one of my favorite local photography spots – Fitzgerald Marine Reserve on the Pacific Coast at Moss Beach, just north of Half Moon Bay.

This image looking up the hill was tweaked a bit in Photoshop CC to add more visual interest. Specifically, I used a Motion Blur filter to create the vertical motion in the trees on the left side of the image – while using other tools to enhance the details and contrast in the grass in the foreground, the path, and the trees on the right side of the image.

For me, the motion blur makes the image more “ethereal” – with the foggy low overcast skies just hitting the tree tops.

Categories
Half Moon Bay Nikon Photography Photography - Nikon D600 Photoshop

The Wonders of Luminosity Masking in Photoshop

_DSC3566

I’m increasingly using the techniques originally pioneered by Tony Kuyper known as “luminosity masking” when editing images in Photoshop. The basic idea behind luminosity masking is to take advantage of the luminosity levels in an image and to use that information to enable much more selective editing of the image.

Imagine, for example, dividing the range of luminosity levels into 10 ranges – from pure which to pure black. Tony’s techniques allow you to easily isolate each of those luminosity ranges so that you can make adjustments to just that portion of an image. Tony’s got some free tutorials on his website and also sells a set of Photoshop actions and a panel that make using his techniques much faster and easier. Along with his stuff, Sean Bagshaw has worked with Tony to create an excellent set of video tutorials that shows how to apply these techniques. Sean’s a great teacher – and the videos are crisp and to the point – also highly recommended!

Here’s an example. Earlier today I visited the Fitzgerald Marine Reserve in Moss Beach just north of Half Moon Bay along the great Pacific Coast south of San Francisco. It was a drizzly wet day on the coast today – and that’s what I was hoping for.

The image above is straight out of the camera (a Nikon D600). Using just a few simple steps applying Tony’s actions, I edited the image into the version below. The tonal contrast is so much better – and it’s also a bit sharper thanks to Don Margulis’ excellent Sharpen 2013 actions (part of his Picture Postcard Workflow). I’ve titled the image “Fallen” – if you look closely you’ll see why – and that’s what caught my eye while walking by this morning.

Fallen - Fitzgerald Marine Reserve - 2013

Categories
adobe creative cloud Photography Photoshop

My Thoughts on Adobe’s Creative Cloud Business Model

Update: Adobe has just announced a new deal for photographers which bundles Photoshop and Lightroom together for $9.99 per month – a much better deal! Thanks for listening Adobe!

A couple of days ago (in a weak moment) I signed up for Adobe’s new Creative Cloud…

I bit my tongue doing so – knowing that I was pledging an on-going revenue stream flowing out of my pocket to Adobe each month into the future. And also knowing that images I create using the Creative Cloud tools (such as Photoshop CC) in this Creative Cloud would simply stop being available for me to process my images when/if I ever decided to terminate Adobe’s monthly draw from my bank account.

This feels a bit like extortion – and, frankly, it sucks. It’s not actually extortion, of course, because I had a “choice” – but it sure feels like it. I hate it.

And, I’m not alone – as many others have expressed their frustrations at being treated this way by Adobe. Any sense of loyalty we might have had to this company has completely gone out the window – for many thousands of formerly faithful customers.

In my experience, what goes around eventually comes around. Adobe opted to exchange its customer goodwill for a recurring revenue stream in the short term – but it will pay a price for treating its users this way in the future. If you work for Adobe, I’m sure you know the resentment this move has engendered.

Creative Cloud indeed – we should have been delighted, instead we’re actually quite disappointed because of this new subscription-based business model – and, indeed, a bit angry about the whole thing.