As I headed out the door this morning to do a bit of grocery shopping for our dinner tonight I stopped by Sharon Park briefly. I love the low sun angle this time of year – and it was filtering through the trees from this particular angle which captured my eyes.
I post-processed this in Photoshop CC using a combination of Topaz Simplify 4, the Oil Paint filter, and some old fashioned dodging and burning to add a stronger sense of depth. Shot with my Fujifilm X100S.
As a street photography, you’re always trying to look for stages – places of visual interest against which you can shoot an interesting image. Finding a stage is one thing – being patient enough to wait for something of visual interest to walk into it is another.
On this particular morning in San Francisco, Doug Kaye and I were finding stages – but the pedestrian traffic was so light that we got frustrated waiting for something to fill the stage.
For this particular shot, I got lucky. I happened to like the stage of the stores’s display window behind – and captured this shot very quickly with my Fujifilm X-E2 as this young woman – in her bell bottoms – walked across the stage. Perhaps not the greatest illustration of this technique – but you get the idea!
I post-processed this in Lightroom 5 and Photoshop CC – applying a bit of Topaz Simplify 4 and a touch of the Oil Paint filter to add a bit of interesting texture.
On Sunday, I often like to take a walk around the Stanford University campus. Parking is usually easy on weekends (except game days!) and there’s so much to explore. I can get a nice hour long walk in and capture some interesting images along the way. Lily and I used to do this regularly – and I still miss her whenever I’m walking Stanford.
Here’s a shot taken with my new Fujifilm X-E2 at Stanford this past Sunday. I was walking around the Quad when I noticed this young woman coming towards me – right in the middle of the walkway. As she got to the stairs, she stopped, looked at her smartphone and began talking – clearly she was in a FaceTime video chat with someone. I thought the like was very beautiful with the striking contrast with the shadows – and snapped this image with the Fujifilm X-E2.
When I got home, I post-processed the image a bit using both Lightroom 5 and Photoshop CC. For shots that tend to be “busy”, I often use Topaz Simplify 4 to remove some of that busyness – and I did that on this image. If you look closely (click on the image to see a larger version), you can see that there’s lots of detail in the center where she is but that as you move out to the edges the details fall away and you just see the major elements of the image. That’s Topaz Simplify in action.
I also applied a touch of cinematic toning (orange-ish highlights, blue-ish shadows) using Lightroom 5’s split toning panel before declaring the image complete!
Here’s another image shot with the new Fujifilm X-E2 – this time it’s a morning scene on San Francisco’s Mission Creek – looking down toward the bridge and, beyond, AT&T Park.
The image was shot handheld with the X-E2 using the 18-55mm “kit” lens. I post-processed it using a touch of Topaz Simplify 4 and a bit of the Oil Paint filter in Photoshop CC – to both remove some details but also add back in a touch of subtle texture (click on the image to open a larger version). A final bit of cinematic toning was applied in Lightroom using the Split Toning panel.
While exploring San Francisco’s Financial District with Doug Kaye, we came across this group of seven guys eating lunch on the steps of Bentley Reserve building on Battery Street. This is one of those lovely old classic bank buildings with columns and all.
I saw these guys as we were about to cross Sacramento Street – and captured this shot. The light was wonderful and they were having fun. Sometimes you get lucky – and this time I did with the look on the faces.
I decided to process this image using a simplification technique that removes details and enhances the overall structure of the image. It helps remove distracting details and often delights. This time it did.
Shot with my Fujifilm X-E2 and post-processed using Topaz Simplify 4 and Photoshop CC.
Doug captured a straight-on shot of these seven – here’s his image!
While walking along Pine St. in San Francisco, I captured this image with my new Fujifilm X-E2 of this guy and his elongated “Texas-size” bicycle frame. He was here for a moment and then gone. Fun street photography!
Post-processed in Lightroom and Photoshop CC with a bit of an oil paint filter applied to make the textures of the light more interesting.
As Doug Kaye and I were walking out on the pier at Pillar Point Harbor in Half Moon Bay, I was drawn to the combination of the angle of the sunlight on the bow of these two fishing boats along with the yellow color of the closest boat (the “Sunshine”). I shot the image with my Fujifilm X100S.
In this version of the image, I’ve exaggerated both the color and the glow – through application of a cinematic toning in Lightroom. The highlights have a bit more orange in them than normal while the shadows have a bit more blue. The combination gives a film-style cinematic effect.
I then brought the image into Photoshop CC and added an Oil Paint layer at about 50% opacity to add some additional texture/shadows into the image. Finally, a 50 pixel black frame around the image to keep your eyes inside.
While I enjoy crystal clear sharp images for most of my photographs, I’ve also developed a taste for a more painterly look for some of my images.
This painterly look is something that can be applied in Photoshop – using either the new Oil Paint filter in Photoshop CC or using the Topaz Simplify 4 plugin. They’re different – and the results are different but both can yield very pleasing results.
There’s something that my brain likes about removing sharp details – and simplifying an image – and that’s what these painterly effects do. Instead of crisp details, those details fall away and just the major elements remain. The effect can be quite subtle – such as in the image above – or more dramatic – such as in the image below. For me, photography encompasses a wide range of techniques – and that painterly look is one I sometimes enjoy in my images.
Both of these images were shot earlier today along San Francisco’s Embarcadero using a Fujifilm X-E1. Doug Kaye and I once again enjoyed exploring one of our favorite San Francisco neighborhoods – along with a late lunch at our favorite: Slanted Door!
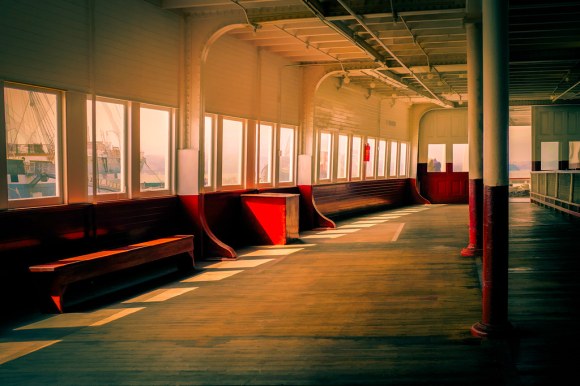
Yesterday I posted a re-edited image shot taken on the Ferryboat Eureka at the San Francisco National Maritime Historic Park in late August with my Fujifilm X100S.
One of my friends commented that he thought the image was “Hopperesque” – referring to the painting style of American artist Edward Hopper.
His comment made me want to try two alternative treatments of this same image – one adjusted in Photoshop CC using Topaz Simplify 4’s Buzsim filter. The second adjusted in Photoshop CC using the Oil Paint filter. You can see both treatments below – frankly, I like both of them better than the original! Both versions are below – click on the image to go to Flickr and see a larger version.
I’m just back from four intensive days with Dan Margulis and four other students (including my friend Doug Kaye) attending his four-day Applied Color Theory in Photoshop workshop. Over the last twenty years, Dan has developed and refined his techniques for color correction and image enhancement of images using Photoshop.
Dan’s written three major books on the subject of Photoshop – which I have and have tried to read and apply – but there’s nothing that can replace the opportunity to actually “do it” in a classroom. For me, this workshop might best be described as a Photoshop “retreat” – spending four long days with a true master of his craft and trying to learn and apply his teachings. The experience was very rewarding – providing me with new insights into what’s possible with images.
The image up top is one example of me attempting to apply some of these techniques. The evening before the workshop, Doug and I headed to Old Town – San Diego with our rangefinder cameras in hand (my Fujifilm X100S and his – a Sony RX1R from Borrowlenses.com that he’s reviewing). The original of this image has a yellow cast – and the first step in Dan’s workflow is to try to correct for color cast before doing anything else. The color cast in this image included a lot of yellow from the wall paint and a lot of blue from the outside light flooding into the room through a doorway. This final result is reasonably balanced and captures the lively colors in the scene. The left facing surfaces still include a blue cast – but the humans look reasonably normal! Not perfect, but better than the original – thanks to new learnings from Dan’s teachings!
This image also uses a technique that Lee Varis taught me – about how to desaturate the color in the shadow areas to provide a greater sense of depth to the image.


 and post-processed using Topaz Simplify 4 and Photoshop CC.